Showing posts with label Regency fashion. Show all posts

Tuesday, January 25, 2011

Jane Austen Evening 2011 - Menswear Recap

The men pulled out all the stops this year at the annual Jane Austen Evening! The ladies looked lovely, as always, but I thought the men really stepped it up. I've got a few pictures to share of the dapper men - but I missed quite a few, there were too many good-looking gents!

And first, what you've all been waiting for...drumroll please...

Chris in his suit! Here he's got on his tailcoat, waistcoat, shirt and cravat. You can see the little ventilation hole in the shirt that he insisted on leaving open lest he die from the heat. The 1930's pants were a big hit - lots of men were wearing modern pants, and he even got a few compliments on them.

 The annual meeting of the Tolerant Husbands Society. This Society is also open to any male friends or brothers that one might be able to bribe with cookies.

Look at the fabulous fit on this outfit! You have to be confident to wear it, that's for sure, and he was quite snazzy. I like the shirring at the sleeve cap. 

I snuck a back view - since he was gracious enough to pose for the front, I figured it was okay. :o) 

Another Chris! This gentleman sews his own clothes (maybe sometime I can get mixed up and bring him home instead of mine? Nah, we'd just fight over the ironing board or something). He's the mastermind behind this Royal Naval uniform that I've drooled over many times - I was so excited when I saw him walk by and had to go over to introduce myself!

I got a closeup of his neckcloth, very impressive! Chris said he used rice starch on his cravat, and Lauren realized that he used the Perfect Pleater for his shirt ruffles. I found his post on the rice starch on the Regency Society of America message boards, where he is a frequent poster, and I'm sure would be willing to answer any questions you might post. I'll probably pop over with a few of my own!

 Undoubtedly the cutest young gentleman at the Ball. Look at those stockings!

These next two outfits might be my favorites of the night, for sheer ingenuity. These men were accompanied by lovely ladies who deconstructed and repurposed thrifted suits, and turned them into incredible regency wear. What a great idea! you get all the fun of making cool collars etc, without having to make the icky welt pockets! (And they were quite well-done too - it wasn't until I was told *the secret* that I saw how they were remade!)

Another repurposed Regency suit, and the fine lady who made it. 

Showing where she pieced the tailcoat together - cut a little off the front, add it to the back, and voila!

And here ends my menswear recap...don't worry, I know I still owe you a review of the waistcoat I made, and probably a couple other things... :) If you want to see the tasty cookies from the event, pop over to V is for Vintage and say hi!

Thursday, January 13, 2011

W is for Waistcoat

I wasn't joking when I said things were going to slow down around here, was I? :) I've been working away, finishing up all the little odds and ends like buttons, hems, etc., and finishing my gown. I've posted about my dress on my new all-purpose blog, V is for Vintage - so if you're interested, please check it out over there!

A couple nights ago I had Chris put on the whole outfit as a first "dress rehearsal". Remember how I was talking about trousers a couple months ago? They're about halfway finished, and we fit them, but he was feeling a little nervous about wearing them. It's a lot of costume to try out all at once, which I completely understand. We decided that instead of him wearing the new trousers, he'll wear some cream high-waisted 1930's style pants he already has - they're fly-front, and the legs are fairly wide, but so what. (kinda funny that he'll be more comfortable in those kooky pants instead of the other kooky pants, but that's how it is. :)

Now that I'm off the hook for his trousers (for now), I think I have time to slap together a waistcoat. It'll be mostly hidden under his coat and I'm just using random fabric from the stash, so I'm just cutting into it without fitting it first. Funny enough, the only appropriate fabric in my stash was the leftover cream wool from abovementioned 1930's pants, so he will be well-coordinated!

Like the shirt and trousers, I'm using the waistcoat pattern from Kannik's Korner. Once I get all three sewn up, I'll be curious to see how well they all fit together (do the top of the trousers meet the bottom of the waistcoat, etc.)


I'm making View C1. Because that's the most dashing.

During the "dress rehearsal", I had him put on a vest from his closet , and I marked where the front of the tailcoat hit. We both decided that his waistcoast shouldn't be too long (not more than an inch or two longer than the front of his tailcoat), and comparing the pattern to the vest, it will be shorter than the tailcoat. That's fine, so we're leaving it alone. Quick and dirty!

Don't forget to account for seam allowance
if you compare a pattern to a garment!

Sunday, January 9, 2011

18th C. Menswear Patterns from LACMA

Reposting this link from the fabulous Two Nerdy History Girls Blog. LACMA has posted free annotated pdf files online of patterns from their new costume collection - similar to the patterns from Tidens Toej, but these have notes in ENGLISH!!

1790's Tailcoat pattern for FREE!

Included are patterns for a men's tailcoat, 2 waistcoats, and a banyan (just learned that term - thanks Lauren!). I'm trying really hard to be happy that they chose all menswear for this project... ;)

Sunday, December 19, 2010

Lining the Tails

I was a good girl last week and worked on lining the tails - as tempted as I was to do the sleeves, I knew that doing the lining after the sleeves were attached would be a huge headache.

First, here's the image from the coat interior from Fashioning Fashion. It's the only real reference image I've managed to track down. I was relieved to see that the linings were pieced together and didn't match terribly well, and I think I managed to replicate that aspect quite well. ;)


So first up with the tails lining is making the pocket. This is the only functional pocket in the coat, so don't skip it. It doesn't have to be pretty, either, since it's on the inside, so don't let that intimidate you. I just did a standard welt pocket, and just made an educated guess as to the placement. Function, not form.


And here's the final inside view - it's a little awkward because I never figured out how the lining would work during the mockup phase, so I had to wing it. The first lining for the front tails was a little short and didn't go all the way up to the dart, but I thought that was awkward so I recut the lining for the front to extend up to the dart. Next time I'll raise the back tail vent a little higher so it's all at the same level. 

The side edge of the top body facing is just raw edge, joined to the inside body of the coat with a whipstitch. The melton wool doesn't really unravel, so a raw edge is fine, and the stitches are barely visible on the other side. I hope. 


The outside view is much prettier! I promise! :)

One of the things I'm really enjoying about writing this blog is how I can make notes about something, and then come back later to reference it. I'll definitely be coming back to this post next time to remind myself of what to improve!

Thursday, December 9, 2010

Fitting the ACTUAL COAT!! :)

Hal & Betty - LA Balboa Dancers, 1939
This past week has been busy! Last weekend we drove up to San Francisco to visit my sister and do some dancing - and in some exciting news, yours truly is the 2010 North American Balboa Champion! Okay, Chris and me both, not just me. That sounds much more impressive than it really is...but then, that's usually the case with Titles. 

Enough with this mid-20th century junk, let's go further back in time.


I've gotten the tailcoat body assembled and the collar attached - looks pretty nice, if I do say so myself! I love love love sewing with this melton wool. It's smooth in the machine, presses beautifully, and is even a dream to cut. I hate cutting! I've adjusted the brightness on the pictures so that hopefully you can see the detail. The actual jacket is deep black, not splotchy. My tailoring book actually recommends using a dark fabric for your first tailoring project, so that mistakes are less likely to show. Good call!


As you can see, I went with modern construction techniques, machine sewing the inside and flipping it right side out. If I had known I was going to use that method from the beginning, I would have picked easier/less pointed collar shapes. The M collar point would be much easier to handstitch together on the outside edge - but I felt that I couldn't just do the collar and not do the rest.


I'm not thrilled with how wide the gap is between the collar point and the lapel - I think that on my mockups the points were closer together, almost touching. I think the difference might be partially because of the thickness of the fabric, and maybe something to do with the roll line/breakpoint placement? Anyway, the right and left sides are even, so that's fine. Something to worry about next time.

I used French Collar Canvas from B. Black, and boy is that stuff heavy-duty! I doubt I'll use it again, and instead opt for a medium weight hymo. But I don't have to worry about his collar drooping!

In the back, I took in a little at the shoulder seam at the armhole, because it was gapping away from the body. That's why the seams don't match at the outer edge. To compensate, I might set the sleeves in toward the center back a little further, but this was an Era of Small Backs, so that should look good.


I haven't touched the tails yet, but already the wool is draping in the back much more nicely than the muslin did. Love that wool melton!

Wednesday, November 24, 2010

Fashioning Fashion At LACMA

Men's Timeline
Women's Timeline
Last weekend a friend and I went to see the exhibit Fashioning Fashion: European Dress in Detail, 1700-1915 at the Los Angeles County Museum of Art. They acquired an extensive private collection a few years ago, and this is the first time these pieces have been on display. We took a gallery tour of the exhibit, and the docent promised that more exhibits are being planned for the collection. I hope so!


Here's a few shots of the exhibit - I was surprised at how it was designed to look so temporary, with every piece in its own "packing crate", but I enjoyed that most items weren't behind glass. The lighting was low and photography was only allowed without a flash, so most of the pictures are a little wonky. But that's typical for my blog! ;)
We were surprised
to see several garments
that didn't match
plaids or stripes!


If you can't make it to the exhibit, check out the gallery catalog - it's got wonderful detail images, and even more info on the items than the exhibit had. The quality of the photography is equal to the V&A Fashion in Detail series, although the V&A books have more photos and Fashioning Fashion has more commentary. Plus the catalog has an inside view photo of an 1825 tailcoat - the construction is slightly different from mine, because it has a waist seam, but I'm thrilled to have a reference image finally!
This waistcoat is
long-sleeved - see it poking
out under the jacket cuff?


I snagged a 1/2 price museum membership on Groupon a couple weeks ago, so I'm planning to go back a couple more times before the exhibit closes in March. Who's in for a trip? :)

Saturday, November 20, 2010

Final Tailcoat Mockup

One cuff jauntily turned back
Here she is, finally! The final tailcoat mockup. For this mockup, instead of muslin I used a mid-weight washed canvas for the body and sleeves, which is closer to my final fabric.

I'm fairly happy with how it's turning out - the body has a pretty good fit, I got the front and back tails to be the same length finally, and I'm even a little surprised with how nice the collar looks. The final coat feels within reach!

We took the pictures after Chris got home late after work, so there's no head and just a modern shirt. ;)


Monday, November 15, 2010

Trousers & Breeches Resources

I was under the weather last week and got a little behind on sewing, but my final coat mockup is nearly done and I'm pretty happy with it. I warned Chris that tomorrow night we need to take pictures, so I should have that for you soon.

Lord Grantham wearing Fall-Front Trousers, 1816

In the meantime, I've got some trouser resources to share. First off, here are a couple basic things I learned recently (and that I'm a little embarrassed I didn't already know).

1. Trousers are long pants. Breeches are short pants. These terms are not interchangeable, and although modern riding breeches may be long and tight, that's not what the period term means.

2. Fly-front and Fall-front trousers were both fashionable in the 18th & 19th centuries, and the trend would swing back and forth between the styles. I thought that fly-front was more "advanced", and that once it was developed, fall-fronts fell out of fashion forever. Wrong. Fly-fronts were popular in the mid-18th century, and then fall-fronts came in during the Regency period.

Fall-Front Breeches
available from
Jas. Townsend
Fly-Front Breeches
available from
Jas. Townsend

Here's a general breakdown: Breeches in fine fabrics were worn with stockings and buckle shoes, and were strictly upper-class. Breeches in solid colors but quality fabrics (linen, leather, cotton) could be worn by the upper- or middle-class, depending on the occasion. Trousers in quality fabrics are upper- or middle-class, and considered fashion forward and trendy. Trousers in poor fabrics were for the lower-classes, where the style originated. 
Pierre Seriziat in leather breeches, 1795

Here are some resources to look at for visuals:

Circa 1820 Trousers - scroll to the bottom of the page. Note the narrow fall front
Circa 1850 Trousers at Vintage Textile - great detail images, note the machine stitching and wide fall that indicates the later period

Fashioning Fashion - Zoom in on Foxyhunter's foxy breeches!
A post about Buckskin Breeches - I really like the comparison to comfortable old jeans
Jessamyn's page on menswear - great variety of images of Regency breeches & trousers


When selecting whether your Mr. Darcy will be wearing breeches or trousers, consider both his persona and personal comfort. As I've said before, Chris didn't want to wear breeches and stockings, which is fine - we're going for a late Regency look (around 1820, I guess), and by that time trousers were acceptable for a man of any age or class, unless you were going to be presented at court that day. Nothing that fancy in our future, I'm afraid!

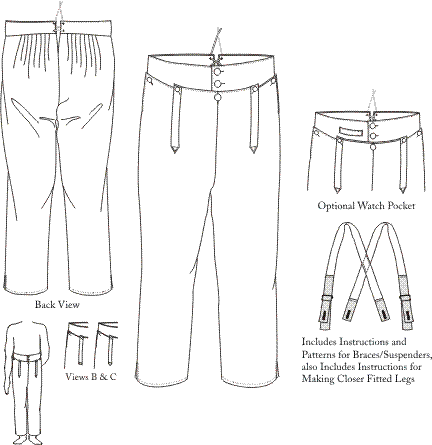
I'm making Chris's trousers, but there are several available ready-made for purchase. For my project, I'm using another Kannik's Korner pattern, High-Waisted Man's Trousers c. 1790-1810. I should probably have just bought a pair for him (hey, there's still time) but I'm worried the ready-made ones would look a little wide instead of long and lean, so I'm hoping I can achieve the desired silhouette without too much hassle.

Monday, November 8, 2010

Tailcoat Sleeve Cuff

As I posted last time, I find the tailcoat sleeve cuff intimidating - and still do, even after working on it. I'm just not sure how it's supposed to work, with an overlap but no slit/placket above the cuff like on a shirtsleeve, so it's the construction aspect that's tripping me up. I'm just winging the whole cuff thing because the only references I can find for this style of cuff are portraits (so not much nitty-gritty detail), but it seems like there was enough variation in cuff construction and style that I should have some leeway.

Instead of using the cuff pattern from Tidens Toej, with its wavy lines that also probably aren't the right length (since I drafted my own undersleeve pattern), I decided to draft my own cuff pattern. I just did straight lines, with a little flare at the end - it's going to be a trial and error pattern piece.

First Cuff Draft and Mockup


The first cuff with the straight edges is a little too tight at the front (top edge of the mockup), and I want it to flare more over the hand. I was reading this article by Lynn McMasters on the shape of different top hats, and realized that the flare of the top hats illustrated are similar to the shape I want for my cuff. So I reworked the cuff to curve, more like top hat pattern "D".


2nd Cuff, based on top hat shape


I like this version more - the cuff definitely has more attitude now! And after playing with cuff shapes, I realized that the 1825 tailcoat in Norah Waugh's Cut of Men's Clothes has a curved cuff too. I love discovering the nuances of period clothing - different coats in the same period would have had different cuff shapes, and it's fun to have options.

Thursday, November 4, 2010

Tailcoat Sleeve

After plugging along on the tailcoat pattern pretty good, I lost some steam after working on the collar and took a break before getting to the sleeve. I think I'm especially intimidated by the cuff. But now it's time to dive back in!

For the top sleeve pattern I used my original scaled up version of the Tidens Toej pattern. I drafted the undersleeve from the top sleeve, using instructions from Men's Garments. It was very easy - basically you trace off the top half of the sleeve (armhole seam to elbow), then rotate it slightly at the elbow and finish tracing to the bottom edge. No need to true up the pattern, because the underarm seamlines should be the same length. I checked to make sure the sleeve cap was larger than the armhole seam, but since it's supposed to have a little puff at the top I didn't really mess with it.

Reshaped the Undersleeve Sleeve Cap
I stitched a sleeve mockup and quickly looked at it on Chris, not attached to the rest of the coat. Not bad, but a couple adjustments were needed:
- the sleeve cap gathers on the Tidens Toej pattern were too far forward for my taste
- the undersleeve was too high under the arm
- the elbow was too low - raise it just 1"


At first I didn't like the look of the undersleeve seam being so far forward and I was going to move it further back to the underside of the arm. Right before I changed the pattern, I read this post on A Tailor Made It that made me realize that 20th century 2-piece sleeves have much smaller undersleeves than earlier garments. It guess it's my modern sensibility coming through wanting to "fix" it. I still don't love how it looks, but since it's "correct" I'll leave it alone.  Laziness wins again!
Mockup with Corrected Sleeve
There's some schmutz at the back underarm, but
he's got good movement, so I'll leave it for now
and maybe take it out of the final version.


With the blousey shirt on, the coat sleeve looks much tighter than before! The armhole is too tight at the front, but once I scoop that out a little I think I'll be ready for my final mockup! (So tempted to cut into my real fabric, but then I remember how  much it cost and I'm okay with another mockup!)

Tuesday, November 2, 2010

Kannik's Korner - Man's Shirt Pattern 1790-1830: Pattern Review

Man's Shirt 1790-1830

This pattern is super-complete. For a shirt that is just made entirely of different sized rectangles, the instructions could easily breeze through in a couple pages, leaving you to figure out the details yourself. Instead, it takes you through the process, including primary and secondary source documentation for the pattern, fabric suggestions & cutting layout, and instructions on how to "cut by the thread" - pulling out threads to get a perfectly on-grain cutting line.

Grainline is straight when the fabric is cut "by the thread"
When you're ready to sew, it carefully takes you, step-by-step, through the construction process with clear and complete instructions and illustrations. Plus it gives instructions for all the hand-sewing techniques needed for the shirt construction, and some added info for shirt ruffles and embroidering the owner's initials. 16 pages total for the instructions!

The one drawback for me was that the patterns are written encouraging you to sew every step by hand. I wound up sewing a lot of the shirt by hand, and I appreciate that they are trying to help you make an authentically reproduced shirt. But because I'm trying to zip through as much of a complete Regency men's outfit as I can, I would have liked a little more guidance about what can be done on the machine and what should be done by hand to still have a pretty authentic shirt, in less time. At least I got better at figuring out which steps to do by hand vs. machine as I went along (for example, sew the first seam of the cuff to the sleeve by machine, then flip it closed and finish the inside by hand, so that no top-stitching shows).

Shirt Overview - no changes to pattern


All in all, I completely recommend this pattern for its authenticity and quality. Even someone with no sewing experience and no sewing machine should be able to make this pattern, and they don't even need to worry about the fit because it's so loose.


Tall Collar!
Chris wears a size 15 shirt, and the pattern came sized as either 14.5 (Small) or 15.5 (Medium). We went with the Small, and the collar is a little tight, but wearable.

I wanted to make this pattern exactly the size without making changes in order to show how it looks, but for next time I'll make the following changes:

-Make the collar/neck size a little bigger (size 15)
-Shorten the collar height - the collar is meant to fold over, but we would rather have it stand up. He'll probably wind up scrunching this one down under his cravat.
-Shorten the neck slit a couple inches for modesty. It'll still be plenty big for his noggin to get through
-Take in the body width/shoulder width ~1 1/2" on each side. It will still be a rectangle, but I think it can be a little less wide and still have a dropped shoulder without restricting arm movement (this will shorten the sleeve length too, but they'll still be acceptably blouson)
-Shorten the body length (we'll hem this one shorter too)


Collar Detail: Still needs shirt ruffles and buttons at the collar

Tuesday, October 26, 2010

Melton and Hymo and Canvas, Oh My!

As we get deeper and deeper into the year, the next Jane Austen Evening looms closer and closer...so rather than working on the coat, which should be my priority, I've been stalling and working on the other (easier) parts. I think Chris might be getting worried that he'll be coatless, cause he's been nudging me back to working on it. He'd rather have a tailcoat than trousers...to each their own! ;)

We set a shopping date to go to B. Black in downtown LA this Saturday. I'm hoping to get everything in one trip because their hours are a little limited so going back several times would be a pain. This means I need to figure out how the darned thing goes together, so I can get the right stuff - easier said than done!

I've only found a couple resources that describe Regency men's coat construction. To Cut a Regency Coat offers descriptions of the inner construction, and Men's Garment's 1830-1900 has a couple pages and a diagram. Not much to go from, but it's a start. Oh! And Lauren has progress shots of her tailcoat in this blog post.

What I've learned is that these garments were less heavily tailored than jackets today - no shoulder pads, self facing/lining at the front, and only a canvas or linen stay at the back neck (the back is unlined). The front skirts were lined with a contrast fabric.

I'm a little panicked, but lists make me feel more in control. What am I missing?

Shopping List
Wool Melton for Body & Front Facing
Contrast Fabric? for Collar
Lining (cotton?) for front skirt & maybe sleeves
Hymo for front interfacing & front shoulder
Collar Canvas for collar interfacing (I already have some, or else I wouldn't be so spendy!)
Undercollar Felt
Twill Tape for roll line
Thread
Buttons (self-covered?)

Can I just say how glad I am that I'm skipping making Halloween costumes this year?

Thursday, October 21, 2010

Shirt-in-Progress

Just for fun, here's a couple pics of Chris's regency shirt in progress. There are no shoulder seams, so you just cut a "T" shaped hole for the head, and then gather the neckline up into the collar.


Shirt without collar
Shirt with Collar.
I made him take off his dress shirt
because the collar would get in the way,
but he's still wearing a t-shirt.
It's just hidden under the folds, sleeves and all!

Pattern illustration of the neckline, gusset & shoulder strap


One little detail at the neckline is the gusset - a gusset is a little patch of fabric that fits into a seam to allow more ease. Here, they're triangular-shaped and go at the corners of the headhole, and then get covered over by a strip at the shoulder. I thought they were a cool detail, but was irritated when my gussets disappeared almost entirely under the shoulder strap and collar (of course, they'll be completely covered by the waistcoat and tailcoat anyway, but I was still irritated).


Nearly Invisible Gusset!


I was thinking that the next time I make a shirt, I might just leave the gusset out and make sure to reinforce the cut edge extra. Then I was thinking about the purpose of a gusset - to give ease - and I realized that the neck gusset is more function than style. Plus, since the gusset is a square, cut diagonally, it's on the bias which helps it curve around the neck. I have a new respect for the neck gusset!


Neck Gusset - Inside View
X-Large pic so that you can (hopefully) see the bias grain