Wednesday, October 27, 2010

Regency House Party

I've just finished watching Regency House Party, which was a reality dating show on the BBC, set in a Manor House in 1815. I had read really terrible reviews of this show (everyone says it didn't stack up to the the others in the series, the dating aspect was cheesy and the people are trite, etc.), but with all the hand-sewing (couch-sitting) to do right now, I thought it would be fun to watch.

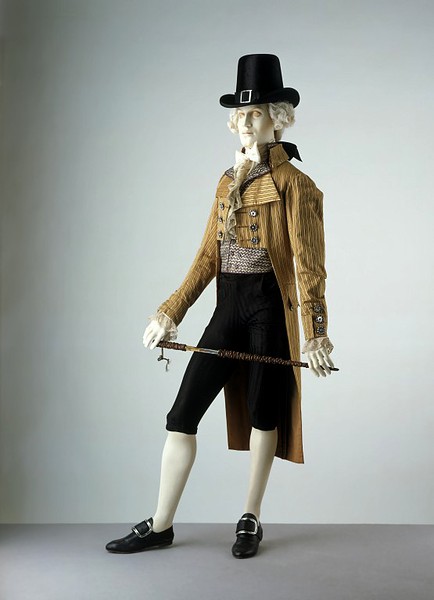
Okay, so it's pretty trite. The personalities are a little annoying, but nothing as bad as Real Housewives. And they don't talk much in detail about clothes (although they did show male stockings with padded calfs and how to twist your shirttail for a little extra help down *there*), but it was a fun show if you don't expect perfect historic accuracy. And one of the benefits of imperfect accuracy in their behavior is that the men go around coatless a good deal of the time, so you can see more of the clothes, and from all angles since reality TV isn't all close-ups and blocked shots. And the men's clothes are pretty darn awesome.

It was an interesting watch, but I'm glad I got it from Netflix instead of buying it. And now I really want to go on an English house party vacation. And attend some sort of historic dinner party that only has candlelight, no electricity. But will we have to use chamberpots?

Tuesday, October 26, 2010

Melton and Hymo and Canvas, Oh My!

As we get deeper and deeper into the year, the next Jane Austen Evening looms closer and closer...so rather than working on the coat, which should be my priority, I've been stalling and working on the other (easier) parts. I think Chris might be getting worried that he'll be coatless, cause he's been nudging me back to working on it. He'd rather have a tailcoat than trousers...to each their own! ;)

We set a shopping date to go to B. Black in downtown LA this Saturday. I'm hoping to get everything in one trip because their hours are a little limited so going back several times would be a pain. This means I need to figure out how the darned thing goes together, so I can get the right stuff - easier said than done!

I've only found a couple resources that describe Regency men's coat construction. To Cut a Regency Coat offers descriptions of the inner construction, and Men's Garment's 1830-1900 has a couple pages and a diagram. Not much to go from, but it's a start. Oh! And Lauren has progress shots of her tailcoat in this blog post.

What I've learned is that these garments were less heavily tailored than jackets today - no shoulder pads, self facing/lining at the front, and only a canvas or linen stay at the back neck (the back is unlined). The front skirts were lined with a contrast fabric.

I'm a little panicked, but lists make me feel more in control. What am I missing?

Shopping List
Wool Melton for Body & Front Facing
Contrast Fabric? for Collar
Lining (cotton?) for front skirt & maybe sleeves
Hymo for front interfacing & front shoulder
Collar Canvas for collar interfacing (I already have some, or else I wouldn't be so spendy!)
Undercollar Felt
Twill Tape for roll line
Thread
Buttons (self-covered?)

Can I just say how glad I am that I'm skipping making Halloween costumes this year?

Thursday, October 21, 2010

Shirt-in-Progress

Just for fun, here's a couple pics of Chris's regency shirt in progress. There are no shoulder seams, so you just cut a "T" shaped hole for the head, and then gather the neckline up into the collar.


Shirt without collar
Shirt with Collar.
I made him take off his dress shirt
because the collar would get in the way,
but he's still wearing a t-shirt.
It's just hidden under the folds, sleeves and all!

Pattern illustration of the neckline, gusset & shoulder strap


One little detail at the neckline is the gusset - a gusset is a little patch of fabric that fits into a seam to allow more ease. Here, they're triangular-shaped and go at the corners of the headhole, and then get covered over by a strip at the shoulder. I thought they were a cool detail, but was irritated when my gussets disappeared almost entirely under the shoulder strap and collar (of course, they'll be completely covered by the waistcoat and tailcoat anyway, but I was still irritated).


Nearly Invisible Gusset!


I was thinking that the next time I make a shirt, I might just leave the gusset out and make sure to reinforce the cut edge extra. Then I was thinking about the purpose of a gusset - to give ease - and I realized that the neck gusset is more function than style. Plus, since the gusset is a square, cut diagonally, it's on the bias which helps it curve around the neck. I have a new respect for the neck gusset!


Neck Gusset - Inside View
X-Large pic so that you can (hopefully) see the bias grain

Wednesday, October 13, 2010

The Pirate Shirt

So if I run out of time to finish Chris's outfit before the next Jane Austen Evening, the good news is that he can just wear a pirate outfit to look authentically 19th Century, right?

Not just for Halloween! ;)

Okay, not quite, but the pirate/poet shirt is based on period shirts -  and chest hair aside, this one has the correct general look. Oversized body, dropped shoulder, big blouse sleeves, deep neck slit and a ruffle down the front. But period shirts have some differences from modern shirts, especially the ones of the pirate costume variety.

Fabric
Lord Byron inspired
"poet" shirt trends for centuries
Shirts were primarily made of linen and sometimes cotton. These fabrics are easy to clean and hardwearing, so they can take a good scrub without falling apart. Bright white and high thread count is good for a gentleman - if you're portraying a lower class, you can have use an unbleached, coarser fabric. Stay away from the shiny polyester!

Construction
The fascinating thing about period shirts is that they were made entirely of different sized rectangles - every seam is a straight line. Gussets are inserted at the neck, underarm, etc to help curve around the body, and the excess fabric is gathered up into the collar and the cuff. That's why the shirts are so blousy. If you make your own shirt, decide if you want to use a modern costume pattern that has shaped pieces, or a period pattern with all straight pieces. (A modern pattern might not be "accurate", but it might look perfectly nice and will use modern sewing techniques.)

Variations
There are a few decorative options to consider. Do you want a front ruffle or plain front? Do you want sleeve ruffles (though these fell out of fashion by the early 19th C.)? Are you going to use traditional thread buttons, or find some metal or shell buttons instead? Be sure to consider the class you're representing and the formality/informality of the event, but have fun with your choices.

References
Extant* 1807 Shirt from The National Maritime Museum
Front View


Close-Up of Collar


At the blue door - a lovely blog entry about making a period shirt. Fantastic pics and info!
Kannik's Korner - Shirt Construction
Vintage Shirt Company - Repro shirts, shows a variety of options

*Extant means "existing". I just recently looked that up!

Tuesday, October 12, 2010

Collar Pattern & Fitting, Part 2

I worked on the collar pattern a little more, and I'm much happier with it now. I did take it into work for pattern help - I wasn't sure if the problem was the neckline or the collar, and I didn't want to waste time "fixing" the wrong thing. Turns out the major culprit was the collar - much easier to fix.

To review, here's the collar in the 1st Fitting:
1st Collar Mockup - Collar is pulling away at the neckline seam where it meets the Lapel

Collar Pattern after 1st Mockup - Darker Line shows the refined Point

So here's the fix - the collar needs to curve up more along the neckline seam. Because the collar seamline was too straight, it was tugging in an odd direction. I decided to curve the neckline up about 1" higher than it was before (1" was just an educated guess).

I traced the straight-ish back neckline edge with no changes, marked the new point I was aiming to curve up to, and slashed the collar from edge to the neckline (at one point I thought this was all wrong and threw away the process pattern, so no pics...but I'll do some if anyone ever asks). Keeping the front neck seamline the same length (bottom edge), I curved it up into my new shape. But! By overlapping the outer edge to make the new curved shape, the pattern became too tight on the outer edge, which was the same problem I had with my very first collar draft. GOING IN CIRCLES!! So I laid the pattern back out flat, and traced that top edge in the shape it wanted to be - but it's now longer than my original CB line, so I had to change the angle of the CB seam.

Collar After Correction - Neckline edge is more curved (bottom edge), Point remains the same
 The collar pattern looks completely different from any of the examples I've been looking at (thus the trashed collar pattern mentioned above). But I decided to give it a shot and stitch it onto my mockup - VICTORY!! Now the collar lays much more nicely where it joins the lapel. (Okay, I have to take out a smidge from CB, but you can't really tell here.) If I ever make another coat from this pattern, I'll want to rework this area, but I think it's time to call it good enough and MOVE ON. :)
Corrected Collar Mockup - Note the smooth roll where the lapel and collar meet

Monday, October 11, 2010

Wm. Booth, Draper: Store Review

Last weekend I got tired of spinning my wheels on the coat pattern, and took a break to think about the rest of Chris's ensemble. Trolling around, I think I've figured out that (at the least) he'll need a shirt, waistcoat (vest), breeches or trousers, a cravat (giant neckcloth) and some sort of shoes & socks/stockings.

For the shirt, waistcoat, and trousers, I settled on patterns produced by Kannik's Korner (full reviews of patterns to come). I almost bought the patterns directly from the company but then rooted a little more on the internet and came across Wm. Booth, Draper.

What a lovely store! They carry a wide variety of products for historical reenactors, primarily for 17th-19th centuries. What sold me was the listing of of all the materials you need to make up the patterns (which you can conveniently purchase from them. ;) I bought all the items listed for a gentleman's shirt of high-quality linen - fabric, thread, metal sleeve buttons, thread buttons. It wasn't cheap (the total bill for everything including 3 patterns & shipping was $154) but saving the effort of trying to source the materials for less, not to mention figuring out everything I need, was completely worth the money for me. Now when I'm out fabric shopping I'll be able to note where to find things for the future, but I hate buying things and then deciding later it's not correct. Plus with a project this huge, I need all my spare time for sewing, not shopping!

The package was shipped the next business day, and it was sent Priority so it arrived in just a couple days. And they refunded a couple dollars on the shipping price! I didn't require any communication with them, but I'm confident they would respond quickly and completely to any inquiries.

Full marks for Wm. Booth, Draper!

Wednesday, October 6, 2010

Collar Pattern & Fitting, Part 1

With all these options, it seems like it should be easy enough to make up some sort of collar, right? Well hopefully for you it's easier than it was for me...for the last couple weeks I've been struggling to get my collar to fit and lay right. 

Remember how I changed the front neckline in the first fitting, and the neckline curve became a tighter circle? Because the neckline shape changed, I decided to scrap the collar I scaled up from the Tidens Toej pattern and draft a new one using Men's Garments 1830-1900. This book has been extremely helpful to me so far, but that version of the draft didn't work because the neckline is so much tighter...the inner edge is so tightly curved, that the outer edge became too tight.

Original Collar draft - probably should have stuck to this version!
Drafted Collar, Slashed and Spread to open up the outer curve
I was just hoping that my new collar would be big enough, and I planned to tweak it significantly in the next fitting. The shape of that outer edge is really ugly!


It turns out, I over-spread the collar draft a little bit, so I'm taking about 1" out of the center back collar. We also shaped the collar to be a little more narrow at the front - it's on the smaller side for the period, but not quite as small as the original inspiration portrait. I kind of insisted on having the "M" shaped collar point - I don't think Chris cares for it much, but to me it's a really cool feature of the period that I didn't want to leave out.

One part I'm still struggling with is getting the collar to roll correctly at the front collar/lapel - you can see it pulling away from Chris's neck where I've got it marked with a pin on one side. I think it's the neckline shape that's the problem, not the sewing. I'm going to ask a patternmaker at work for help, and I'll post the correction here.

BTW, taking pictures when we fit has been really helpful to refer back to when working on the pattern. That way I don't have to ask him to put it back on every 5 minutes!


Viewer's Left: Unshaped Collar as drafted
Viewer's Right: Collar is trimmed and "M" Point defined
Viewer's Left: Collar Trimmed
Viewer's RIght: Unshaped Collar

Tuesday, October 5, 2010

Crazy Regency Collars!

There is a great variety of collars in Regency era coats, and I think it's an opportunity for the wearer to express his personality. For civilian coats, the collar should be wide and turnback, but there are a great many choices of collar shape, point shape, and even fabric.

Here is a sampling of coats, mostly from the Victoria & Albert museum collection. Note the variety of collar options! 
French Tailcoat c.1800
High Turndown Collar & Wide Revers/Lapels
Hunting Coat c.1815
Wide Self Fabric Collar with "M" Shape
Velvet Collar with Peak Lapel
Self Fabric Collar c.1815
Detail of "Thrush's Tongue" or "Lark's Tongue" Collar from above coat

Searching museum collections online is relatively new for me - I've only spent a little time looking at the V&A, the Metropolitan Museum of Art, and a couple others. If you have a favorite collection or search method, please share!